Add a Custom Domain to Blogger: Easy Step-by-Step (2026)
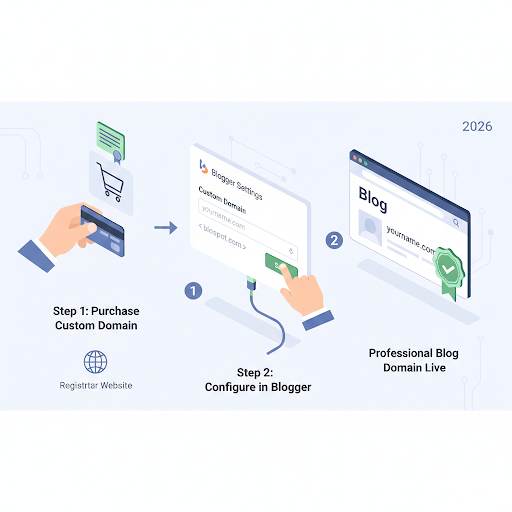
📘 TL;DR – What you’ll learn: A custom domain (like yourblog.com) replaces the default .blogspot.com URL – making your blog look professional, improving SEO, and building trust. This guide walks you through buying a domain, connecting it to Blogger in 6 simple steps, and enabling HTTPS. Takes 10‑20 minutes. No tech skills required.
🔥 The .blogspot Problem
Let me ask you something, friend. Does your blog URL still look like yourblogname.blogspot.com? That’s fine when you’re starting out. But if you want to look professional, build trust, and improve your SEO, it’s time to add a custom domain to Blogger. The good news? It takes about 10 minutes. No tech skills required. Let me show you exactly how.
Before you buy a domain, make sure you choose the right one. My Choosing the Right Domain Name guide covers everything you need to know – from avoiding numbers and hyphens to picking something brandable. And if you haven’t set up your Blogger blog yet, start with How to Start a Blog on Blogger – it walks you through creating your free blog in minutes.
📌 Real story – Omar finally looked professional
Omar had a great blog about freelance tips. But his URL was “omarfreelance.blogspot.com.” He felt embarrassed to share it with potential clients. After following this guide, he bought a $12 domain and connected it to Blogger in 15 minutes. His first client said: “Your blog looks so professional!” One small change. One huge difference.
⚠️ The #1 mistake beginners make: They keep the .blogspot domain forever because they think adding a custom domain is “too technical.” It’s not. Follow these 6 steps, and you’ll be done before your coffee gets cold.
✅ What Is a Custom Domain?
Let’s start with the basics. Your default Blogger URL probably looks like: yourblogname.blogspot.com
A custom domain replaces that with something like: www.yourblogname.com
Looks cleaner, right? It also helps with branding, SEO, and building trust with visitors.
📊 Why You Should Add a Custom Domain to Blogger
- You look more professional: Brands and readers trust a custom domain more.
- Better SEO: Google prefers custom domains over free subdomains.
- Easier to remember: Shorter and cleaner domain = more return visitors.
🛠️ What You Need to Get Started
- ✅ A Blogger blog already set up
- ✅ A domain name (buy from Namecheap, Google Domains, or GoDaddy – ~$10‑$15/year)
- ✅ A little bit of patience — it takes about 10–20 minutes
🚀 Step‑by‑Step: How to Add a Custom Domain to Blogger
Step 1: Buy a Domain Name
If you don’t have one yet, choose a domain name that matches your blog name or niche. Try to keep it short, simple, and easy to spell. You can buy one from Namecheap, Google Domains, or GoDaddy.
Step 2: Go to Your Blogger Settings
- Log in to Blogger
- Click your blog name
- Go to Settings
- Scroll to Publishing → click Custom domain
Step 3: Enter Your Domain
- Type your domain (like
www.myblog.com) and hit Save. - Blogger will show you some special codes (called CNAMEs).
Don’t worry, these are just to help Blogger connect your domain.
Step 4: Add the CNAME Records to Your Domain Provider
- Go to your domain provider’s DNS settings
- Find the area where you can manage “DNS” or “Custom Records“
- Add the CNAME records exactly as shown in Blogger
- Save changes
Step 5: Wait for DNS to Update
- It can take anywhere from 10 minutes to 48 hours (usually less).
- Once it updates, go back to Blogger and hit Save again.
Step 6: Turn on HTTPS
- Still in Blogger → Settings → scroll to HTTPS and make sure it’s enabled.
- This gives your blog the little lock icon 🔒 and helps build trust. For a complete guide, read HTTPS on Blogger – it covers how to fix the “Not Secure” warning in 60 seconds.
That’s it — you’re live with a custom domain! 🎉
❌ Common Beginner Mistakes to Avoid
- Forgetting the “www”: Blogger usually requires the full www.domain.com — not just domain.com.
- Not setting the CNAME records properly: Double‑check that you entered them exactly as Blogger gives them.
- Skipping the HTTPS step: This one’s important for security and SEO.
- Expecting instant results: Sometimes DNS changes take a few hours to go live — be patient.
💡 The Brutal Truth (Read This Twice)
Most beginners never upgrade to a custom domain because they think it’s complicated. They stay on the free .blogspot address forever, wondering why their blog doesn’t look professional. Meanwhile, Omar spent $12 and 15 minutes, and his blog instantly looked credible.
Adding a custom domain to Blogger is not hard. It’s a one‑time setup. Once it’s done, it’s done forever. Your blog will look more professional, rank better on Google, and be easier for readers to remember. There is no downside.
⚠️ Remember: A custom domain costs $10‑$15 per year. That’s less than a coffee per month. The return in credibility and SEO is worth every penny.
🤔 Still Wondering About This Stuff?
Is a custom domain free? No — domains cost around $10‑$15/year. Blogger itself is free though.
Will I lose my blog posts? Nope. Everything stays exactly the same — just a new URL.
Do I need hosting? Not at all. Blogger hosts your site for free. You only need the domain.
📅 Your 7‑Day Custom Domain Action Plan
- Day 1 (Today): Buy your domain (Namecheap or Google Domains – ~$12/year).
- Day 2: Go to Blogger Settings → Publishing → Enter your domain.
- Day 3: Copy the CNAME records from Blogger.
- Day 4: Add the CNAME records to your domain provider’s DNS settings.
- Day 5: Wait for DNS to propagate (check every few hours).
- Day 6: Go back to Blogger, click Save, and enable HTTPS.
- Day 7: Test your new domain. Share it proudly. You’re now professional.
After 7 days, your blog will have a clean, professional .com address. $12 spent. Worth every penny.
🙋 Frequently Asked Questions
Can I use a domain I already own?
Yes. If you already have a domain from another project, you can connect it to Blogger using the same steps.
What if my domain provider doesn’t show CNAME options?
Most providers do. Look for “DNS Management” or “Advanced DNS.” If you’re stuck, contact their support – they’ll help you find it.
Will my old .blogspot URL still work?
Yes. Blogger automatically redirects your old .blogspot URL to your new custom domain. So any existing links will still work.
Do I need to update my sitemap after changing the domain?
No. Blogger updates it automatically. But it’s a good idea to resubmit it to Google Search Console after the domain is live.
What if I want to change my domain later?
You can, but it’s a bigger process. Choose carefully the first time. Read the domain name guide linked above to make the right choice.
🎤 Final Thoughts: Level Up Your Blog Today
Adding a custom domain to your Blogger blog is one of the easiest ways to level up your blog — especially if you’re serious about it. It’s not just about looking more professional — it’s about showing the world that your blog is yours. And with Blogger making it free and simple to manage, there’s no reason to wait.
If you’ve been putting it off, take the first step today. Buy your domain, follow these steps, and enjoy the feeling of owning your space on the internet.
You’ve got this, friend. 👻
👉 Ready to upgrade your Blogger blog with a custom domain? Buy your domain from Namecheap or Google Domains. Domains start at $10/year. Follow the 6 steps above. Look professional today.